How to Set Up DMARC, DKIM, and SPF Records for Your Domain
Have you ever sent a perfectly crafted email, only to find it buried in your recipient’s spam folder—or worse, not delivered at all? This is often a sign that your domain lacks proper email authentication. To fix this, you need to configure DMARC, DKIM, and SPF records. These essential protocols work behind the scenes to verify that emails sent from your domain are legitimate and authorized. They prevent cybercriminals from impersonating your domain (a tactic known as spoofing) and significantly improve your email deliverability. In this guide, we’ll explain what each of these records does and how you can set them up step by step—even if you’re not a tech expert.
🔐 What Are DMARC, DKIM, and SPF?
- SPF (Sender Policy Framework): SPF is like a guest list for your domain’s email senders. It tells recipient servers which IP addresses or third-party services (like Google Workspace, Zoho, Mailchimp, etc.) are authorized to send emails on your behalf. When an email arrives, the receiving server checks the SPF record in your DNS. If the sender’s IP matches the list, the email passes SPF. If not, it’s flagged as suspicious or rejected. This helps block spoofed emails pretending to come from your domain.
- DKIM (DomainKeys Identified Mail): DKIM adds a unique encrypted signature to every email your domain sends. This signature is generated using a private key and verified by recipients using the public key stored in your DNS. If the email’s content has been tampered with, the DKIM signature check fails. Think of it as sealing your email with a tamper-proof wax stamp that guarantees it wasn’t altered during transit.
- DMARC (Domain-based Message Authentication, Reporting & Conformance): DMARC ties SPF and DKIM together under a single policy and tells receiving servers how to handle emails that fail authentication. You can set DMARC to take one of three actions: do nothing (
p=none), send to spam/quarantine (p=quarantine), or reject the email outright (p=reject). DMARC also lets you receive reports about who is sending emails using your domain—helping you monitor abuse and spot impersonation attempts.
🛠️ Step-by-Step Guide to Set Up SPF, DKIM, and DMARC
Step 1: Locate Your DNS Management Panel
Access your domain registrar or DNS provider (e.g., GoDaddy, Namecheap, Cloudflare). You’ll be adding DNS TXT records here.
Step 2: Add an SPF Record
The SPF record is a type of TXT record that lists approved email-sending servers.
Example SPF Record:
v=spf1 include:_spf.google.com ~all
This means Google servers are authorized to send emails on your domain’s behalf.
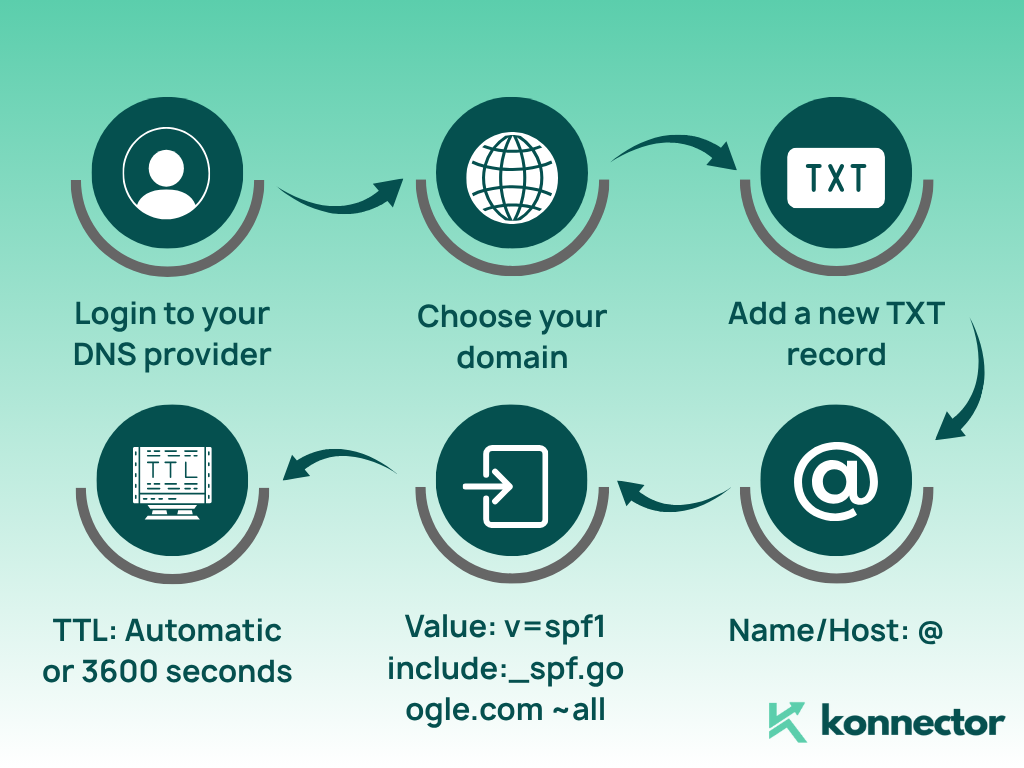
- Login to your DNS provider
- Choose your domain
- Add a new TXT record
- Name/Host:
@ - Value:
v=spf1 include:_spf.google.com ~all - TTL: Automatic or 3600 seconds
Step 3: Set Up DKIM
DKIM is usually generated by your email provider (like Google Workspace, Zoho Mail, etc.).
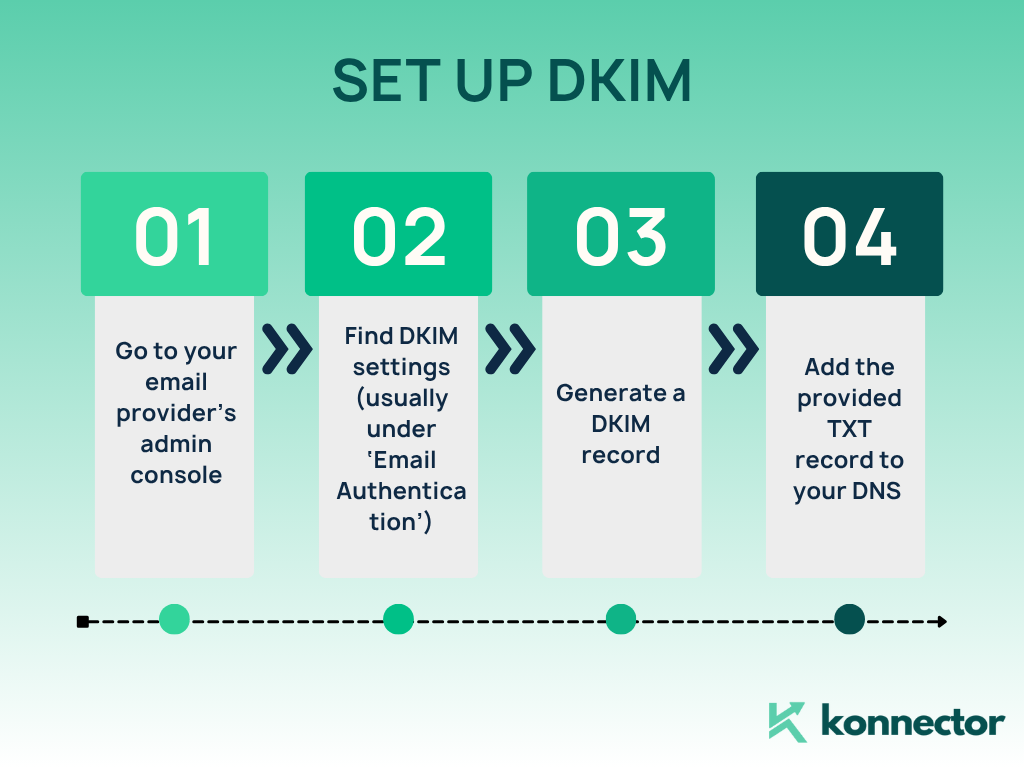
- Go to your email provider’s admin console
- Find DKIM settings (usually under ‘Email Authentication’)
- Generate a DKIM record
- Add the provided TXT record to your DNS with:
Name/Host:
google._domainkey
Value: Starts withv=DKIM1; k=rsa; p=...
Once added, go back to your email provider and click “Start Authentication” or “Verify.”
Step 4: Set Up DMARC
DMARC tells receiving servers how to handle messages that fail SPF and DKIM checks. It also provides reporting.
Basic DMARC Record:
v=DMARC1; p=none; rua=mailto:postmaster@yourdomain.com
- Login to DNS
- Add a TXT record
- Name/Host:
_dmarc - Value:
v=DMARC1; p=none; rua=mailto:postmaster@yourdomain.com
You can change the policy later to quarantine or reject once you’ve reviewed reports.
Read more—-> How to decide between cold e-mailing and cold calling?
✅ Verifying the Records
Once you’ve added SPF, DKIM, and DMARC records to your domain’s DNS, it’s important to verify that everything is set up correctly. Misconfigured records can lead to failed email deliveries, reduced sender reputation, or even security vulnerabilities. Here’s how you can test each protocol:
- SPF: Use tools like
MXToolbox SPF checker to look up your domain’s SPF record. It will validate whether your syntax is correct and whether all authorized IPs or email services (like Google, Microsoft, Mailgun) are included. If you see multiple SPF records, fix it immediately—SPF only allows one valid record per domain. - DKIM: To check whether DKIM signing is active and valid, send a test email to
DKIMValidator.com. It will analyze the headers of your email to verify if the DKIM signature is present and passes cryptographic checks. Make sure to send the test email from the same domain and service that you’re authenticating. - DMARC: Use
Dmarcian or
MXToolbox DMARC checker to validate your DMARC record. These tools check if your DMARC policy is correctly structured, confirm your reporting email addresses are valid, and highlight any configuration issues. Over time, you can also review DMARC reports sent to your email to see who is using your domain to send mail and whether they’re passing SPF/DKIM checks.
Tip: Always wait a few minutes to a couple of hours after editing DNS records before testing, as DNS changes can take time to propagate.
Read more—> How to Introduce Yourself in an Email?
🧠 Best Practices for Email Authentication
To ensure your email authentication setup is effective and secure, follow these best practices for SPF, DKIM, and DMARC:
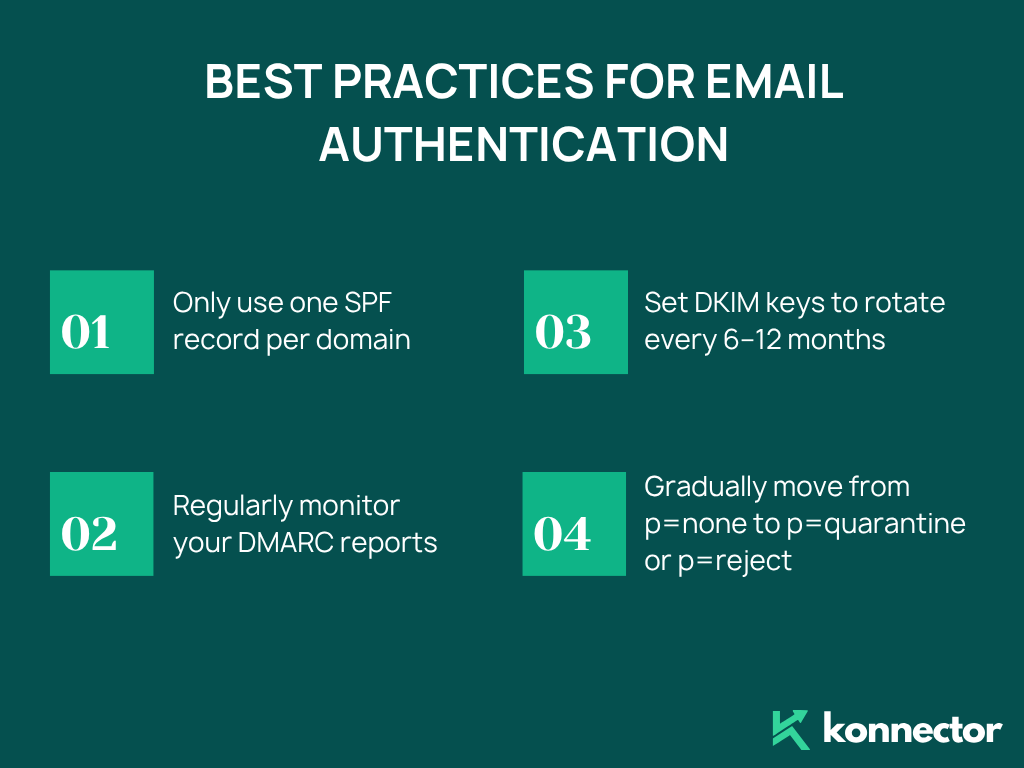
- Only use one SPF record per domain:
SPF doesn’t support multiple records. If you need to authorize multiple email services (like Google Workspace, Mailchimp, and a transactional email service), combine them into a single record using theinclude:mechanism. Having more than one SPF record will result in a fail, which can impact email deliverability. - Regularly monitor your DMARC reports:
DMARC allows you to receive detailed reports (sent to the email specified in therua=tag) that show how emails sent from your domain are being handled. These reports help identify unauthorized usage, spoofing attempts, or misconfigurations. Use tools like DMARCian, Postmark, or Google Postmaster Tools to view these XML reports in a readable format. - Set DKIM keys to rotate every 6–12 months:
DKIM uses cryptographic keys to sign your emails, and just like passwords, these keys should be rotated periodically to reduce the risk of compromise. Some email providers handle this automatically, but if you’re managing it manually, set a calendar reminder to update and re-publish your DKIM records at least once a year. - Gradually move from
p=nonetop=quarantineorp=reject:
When you first implement DMARC, it’s safest to start withp=none. This means you’re only monitoring and not impacting email flow. Once you’re confident your SPF and DKIM records are working correctly, transition top=quarantine(send failures to spam), and eventually top=reject(block unauthenticated emails completely). This phased approach reduces the risk of accidentally blocking legitimate messages while improving your domain’s email security over time.
💡 Final Thoughts
Email authentication may sound technical, but once set up, it significantly improves your domain’s email deliverability and security. If you’re using email for marketing, business communication, or outreach — DMARC, DKIM, and SPF are essential shields against phishing and spoofing.
Still unsure or short on time? Many email marketing platforms (like Google Workspace, Zoho Mail, SendGrid, or Mailchimp) have built-in wizards or guides that generate the necessary records for you. All you need to do is copy and paste them into your DNS panel.
11x Your LinkedIn Outreach With
Automation and Gen AI
Harness the power of LinkedIn Automation and Gen AI to amplify your reach like never before. Engage thousands of leads weekly with AI-driven comments and targeted campaigns—all from one lead-gen powerhouse platform.
Frequently Asked Questions
SPF verifies which mail servers are allowed to send on behalf of your domain.
DKIM checks if the email was altered during transit by validating a cryptographic signature.
DMARC uses SPF and DKIM results to decide what to do with suspicious emails and provides reporting.
Yes. While each protocol adds a layer of security, using all three together offers the strongest protection against email spoofing, phishing, and delivery issues.
Yes. Most major providers like Google Workspace, Microsoft 365, Zoho, etc., offer step-by-step instructions and generate the necessary DNS records for you to add at your domain registrar.
You need to add them as TXT records in your domain’s DNS settings. You can do this through your domain registrar (like GoDaddy, Namecheap, Cloudflare, etc.).
DNS changes can take anywhere from a few minutes to up to 48 hours to fully propagate across the internet.
No. You can only have one SPF record per domain. If you need to authorize multiple services, combine them using the include: mechanism in a single SPF record.
Use tools like:
MXToolbox for SPF and DMARC lookups
DKIMValidator.com for DKIM verification
Dmarcian or Postmark to visualize DMARC reports
p=none: Just monitor and collect reports (no action taken)
p=quarantine: Flag or move suspicious emails to spam
p=reject: Block unauthenticated emails completely
Yes. It's a good practice to rotate your DKIM keys every 6–12 months to minimize security risks.
Emails from your domain may:
Land in spam folders
Fail to deliver or get spoofed by attackers or always test your records after setup and monitor reports regularly.